In this tutorial created by you will reproduce in Adobe Photoshop a login and a profile page for a UI Design app exercising basic Photoshop skills and design concepts applied for UI Design.
Goals:
In this tutorial you will develop the following skills and concepts:
- Adobe Photoshop
- File Management
Steps:
- Explore the Digital Imaging Resources to understand and get familiarized with Adobe Photoshop.
- Create a folder named T1_Interface_Design.
- Inside the folder created above, create a subfolder labelled Assets.
- Download the images below saving them in the subfolder Assets. If you decide to use your own photo. Also save it in the Assets subfolder. Otherwise use Leroy Courage’s photo below:
Shop Icon
Facebook Icon
New Message Icon
Photo of Leroy Courage - Open Photoshop. Go to File/New and set up a new file with the following specs:
Size: 640 pixel width x 1136 pixel height, at 72 dpi - Save the Photoshop file (PSD) you just created in the folder T1_Interface_Design naming it Your_Name_Tutorial_1.psd (ex: Claudia_Jacques_Tutorial1.psd)
- Choose a Sans Serif and an Ornamental font that you already have installed in your computer, or go to Adobe CC Fonts, Google Fonts or download the ones shared below. If you have to download the fonts, first create a folder named Fonts under YT1_Interface_Design and save them in there. Check this video if you need help installing fonts in your PC. Or this one if you need help installing fonts in a Mac.
Fonts used in the tutorial:
Sans Serif: Arial Narrow
Ornamental: Boulevard Saint DenisStick to a main font as sans serif and an ornamental font for special elements as in the video below.
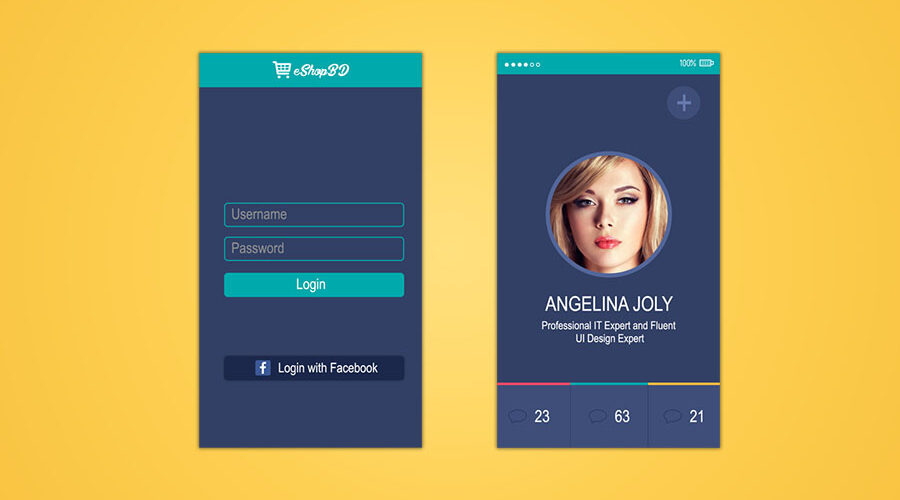
- Reproduce in Photoshop the interfaces presented in the video below:
Source: Apple Graphic Studio
9. Save the file as PSD.
10. In order to submit your work, you will need to save the two pages as png. In Photoshop, select the Login Page layers in the Layers Panel. Now go to File/Export/Save for Web (Legacy) to optimize the image for web as PNG. Save the file in the T1_Interface_Design folder naming it Your_Name_Tutorial_1a.png (ex: Claudia_Jacques_Tutorial_1a.png)
11. Repeat the step above selecting the Profile Page layers in the Layers Panel. Go to File/Export/Save for Web (Legacy) to optimize the image for web as PNG. Save the file in the T1_Interface_Design folder naming it Your_Name_Tutorial_1b.png (ex: Claudia_Jacques_Tutorial_1b.png)
12. Upload the PSD and the two PNGs files to Blackboard/Work Submission/Assignments/Tutorial 1 along with screen shot(s) of the folders you created for this project.
Grading [4 points]:
- Craftsmanship+Skills: Proper Size, Type, Color, Graphics, Alignment and Consistency (1 points)
- Created and submitted to Blackboard a Login and a Profile page in Photoshop (2 points)
- Posted the Login and Profile pages in png to Blackboard (0.5 point)
- Posted screenshot(s) of your the directory (folder) used to share your file management skills (0.5 point)